
Cherry pie filling is one of those timeless treats that can instantly make your day sweeter. Whether you’re a seasoned baker or just looking for a simple, homemade dessert, this recipe will show you how easy it is to make cherry pie filling from scratch. The natural sweetness of fresh cherries combined with a touch of sugar and a hint of lemon juice creates a perfect balance of flavors that can be used in so many ways. From pies to cakes, ice cream, or even waffles, this cherry pie filling is versatile and sure to become a family favorite. Let’s dive into this delightful recipe and discover how quick and satisfying it is to make your own homemade cherry pie filling!
1. Key Benefits
Making your own cherry pie filling isn’t just about creating something delicious—it’s about bringing a little extra joy into your kitchen. Here are some key benefits that will have you reaching for that cherry jar and apron in no time:
Table of Contents
- Fresh, Natural Ingredients: Unlike store-bought versions, homemade cherry pie filling allows you to use fresh, natural ingredients. No artificial preservatives, just the sweetness of ripe cherries, sugar, and a hint of citrus.
- Quick & Easy: With just a few simple ingredients, you can whip up a cherry pie filling in under 30 minutes. It’s a perfect go-to when you need something sweet in a pinch!
- Versatility: While it’s great for pies, homemade cherry pie filling can also be used in cakes, pastries, parfaits, or even drizzled over vanilla ice cream. Its versatility makes it a great staple for any baker’s repertoire.
- Customization: One of the best things about making your own cherry pie filling is that you can easily adjust the sweetness, flavor, or consistency. Want it a little thicker? Add more cornstarch. Prefer it less sweet? Use less sugar or swap in a sugar substitute. You’re in control!
- Family Favorite: This recipe is perfect for creating memories. It’s an easy way to get the whole family involved in the kitchen, and the result is a dish everyone will love. It’s sure to become a favorite!
By making cherry pie filling from scratch, you’re not just creating a treat—you’re elevating your desserts with flavor, freshness, and a personal touch. Ready to give it a try? Let’s move on to the ingredients!
2. Ingredients
Now that you’re excited to make your own cherry pie filling, let’s take a look at the simple ingredients you’ll need. This recipe is all about making a delicious, fresh filling with minimal effort!
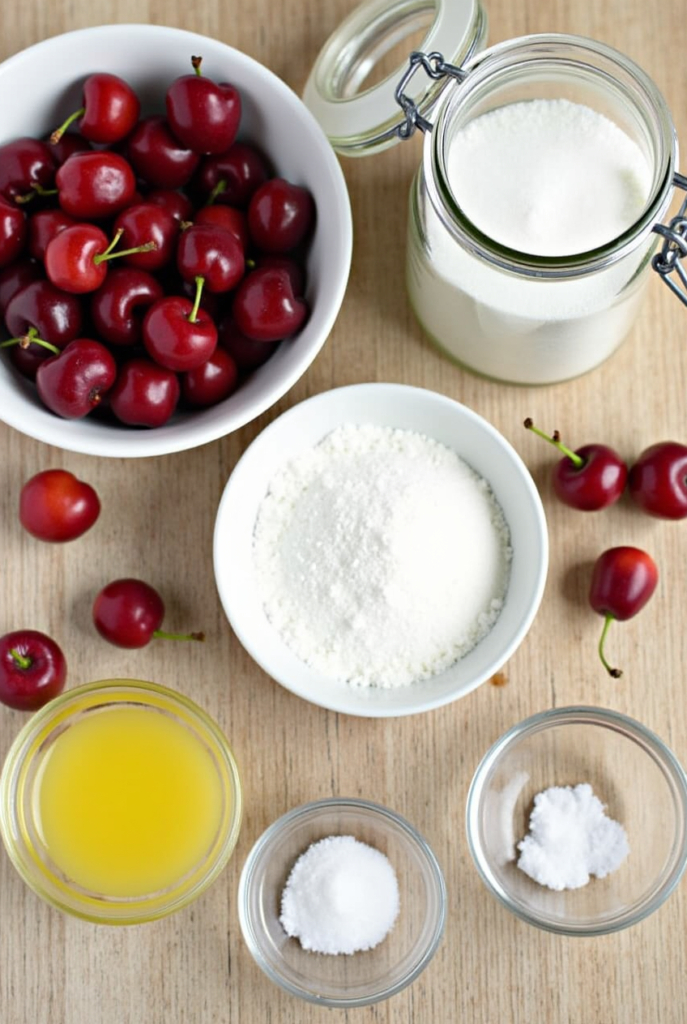
Ingredients:
- 4 cups fresh or frozen cherries – Sweet or tart, both work beautifully! Fresh cherries will give the filling a vibrant, natural flavor, while frozen cherries are perfect when fresh ones aren’t in season.
- 1 cup granulated sugar – You can adjust the amount to suit your sweetness preference. For a less sugary filling, feel free to reduce the sugar by a tablespoon or two.
- 2 tablespoons cornstarch – This is your thickening agent, giving the filling that perfect consistency. If you prefer a thicker filling, you can add a bit more cornstarch, but start small and adjust.
- 1 tablespoon lemon juice – Just a dash of lemon juice enhances the natural flavor of the cherries and balances the sweetness. If you don’t have fresh lemon, bottled juice will do the trick!
- 1 teaspoon vanilla extract – Adds a warm, aromatic depth to the filling. You could also experiment with almond extract for a slightly nutty twist.
- 1/4 cup water – This helps to bring everything together as the cherries cook down, creating that luscious pie filling texture.
Tips for Success:
- Use fresh cherries when possible: The fresher the cherries, the more vibrant and natural the flavor will be. If you’re using frozen cherries, make sure to thaw and drain them to avoid excess moisture.
- Adjust the sweetness: Everyone’s taste is different, so feel free to adjust the sugar level to your liking. For a lower-sugar option, you can substitute with stevia, honey, or maple syrup.
- Thickening options: Cornstarch is the most common thickener, but if you prefer a different option, arrowroot powder or tapioca starch can also work well.
Now that we’ve gathered all the ingredients, you’re ready to move on to the fun part—making the cherry pie filling! Let’s dive into the next step and bring these simple ingredients to life.
3. How to Make Cherry Pie Filling
Ready to turn those simple ingredients into a luscious, homemade cherry pie filling? It’s easier than you might think! Follow these steps, and you’ll have a rich, flavorful filling that’s perfect for pies, cakes, or whatever dessert you choose.
Step-by-Step Instructions:
- Prepare the Cherries: If you’re using fresh cherries, start by pitting them and slicing them in half. This can be a little time-consuming, but it’s worth the effort for that fresh taste. For frozen cherries, just thaw them and drain any excess water.
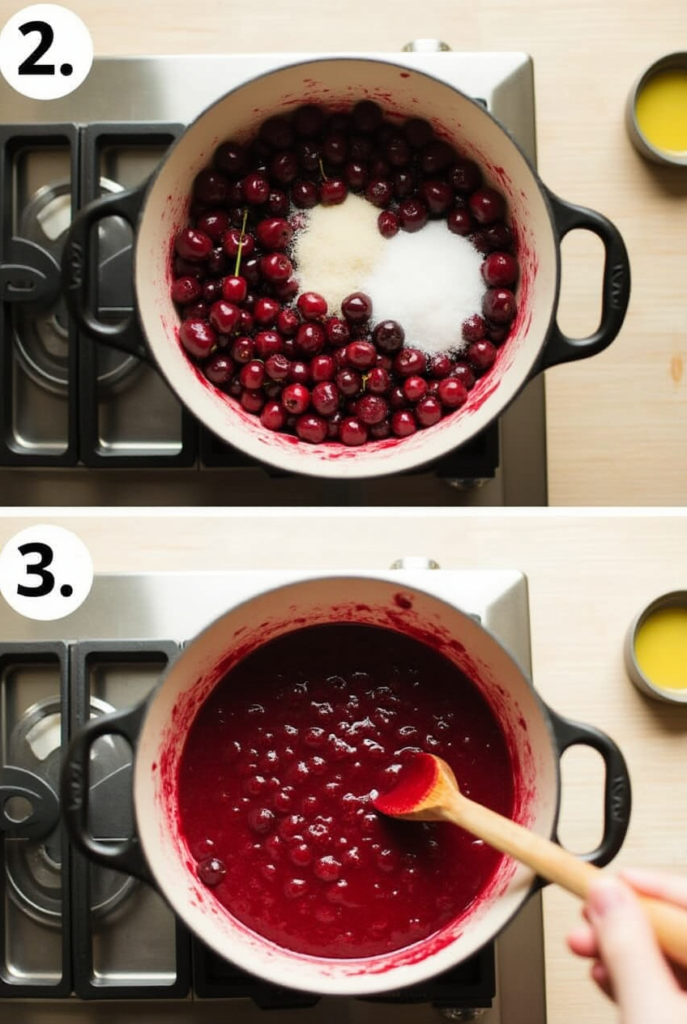
- Combine Sugar and Cornstarch: In a medium saucepan, whisk together the sugar and cornstarch. This creates a base for the filling and ensures that your mixture thickens evenly.
- Add the Cherries: Stir the cherries into the sugar and cornstarch mixture. If you’re using frozen cherries, be sure to add them while they’re still thawed, so they release their juices into the mixture.
- Simmer the Mixture: Add the water and lemon juice to the pan, then place it over medium heat. Stir frequently as the mixture begins to come to a gentle simmer. This is where the magic happens—watch as the filling begins to thicken and turn into a glossy, rich texture.
- Cook Until Thickened: Continue cooking the filling for about 5-7 minutes, stirring occasionally. You’ll notice it getting thicker as the cornstarch does its job. Once it reaches a smooth, thick consistency, remove it from the heat.
- Add Vanilla: Stir in the vanilla extract (or almond extract if you’re feeling adventurous!). This adds a wonderful aroma and a depth of flavor that makes the filling truly special.
- Let It Cool: Allow the cherry pie filling to cool before using it in your pie or dessert. It will thicken a little more as it cools, creating the perfect consistency for filling your crust.
Pro Tips:
- Don’t Rush the Simmer: Be patient and let the mixture simmer until it thickens. If you rush it, you might end up with a runny filling.
- Test Consistency: To check if your filling is thick enough, dip a spoon into the mixture. If the filling coats the back of the spoon and holds its shape, it’s ready.
- Flavor Boost: For an extra layer of flavor, consider adding a pinch of cinnamon or almond extract along with the vanilla. It can take your cherry pie filling to the next level!
And there you have it! Your homemade cherry pie filling is ready to shine in whatever dessert you choose. It’s rich, flavorful, and perfect for creating sweet memories. Ready to move on to pro tips and fun variations? Let’s go!
4. Pro Tips and Variations
Now that you’ve mastered the basic cherry pie filling recipe, let’s explore some pro tips and exciting variations to customize it to your tastes. Whether you want to enhance the flavor, adjust the texture, or get creative with your filling, these tips will help you elevate your homemade pie filling even further!
Pro Tips:
- Perfect Consistency: If you prefer a thicker filling, simply add a little more cornstarch—just a teaspoon at a time. Keep in mind, the filling will thicken further as it cools, so aim for a slightly runnier consistency while it’s still hot. Conversely, if you prefer a thinner filling, reduce the cornstarch slightly.
- Balanced Sweetness: Depending on the cherries you use, the sweetness can vary. For tart cherries, you might need a bit more sugar to balance out the tang. For sweeter cherries, reduce the sugar to your liking. Taste as you go to ensure the perfect flavor!
- Avoid a Watery Filling: If you want to avoid a runny pie filling, make sure to let the mixture simmer long enough. You want the juices from the cherries to thicken and reduce, creating that perfect, jam-like texture.
- Cool Before Using: While it’s tempting to pour hot filling straight into your pie crust, it’s best to let the cherry filling cool a bit before filling your pie. This helps the filling set, reducing the risk of soggy crusts!
Fun Variations:
- Spiced Cherry Pie Filling: Add a pinch of cinnamon or nutmeg to give the filling a warm, comforting flavor. For a cozy autumn twist, try adding a little ground ginger or cloves.
- Almond Twist: If you’re a fan of almond flavor, swap the vanilla extract for almond extract or add both for a delightful flavor boost. The nutty undertones will pair wonderfully with the cherries.
- Berry Mix: Want to add some variety? Mix in other berries like blueberries, raspberries, or strawberries to complement the cherries. This variation adds depth and complexity to the flavor profile.
- Diet-Friendly Options: To make a lower-sugar version, try substituting the granulated sugar with a natural sweetener like stevia or monk fruit. You can also use a sugar-free cherry pie filling mix for an even quicker option.
- Citrus Zest: A bit of lemon zest can add an extra pop of freshness to your cherry pie filling. It brightens the flavor and pairs perfectly with the tartness of the cherries.
By experimenting with these tips and variations, you can make this cherry pie filling your own, perfectly tailored to your preferences or dietary needs. Now that you’ve got the basics down, it’s time to get creative! Whether you’re baking a classic cherry pie or using the filling in other desserts, these pro tips will ensure your filling is always a hit. Ready to serve it up? Let’s move on to some delicious serving suggestions!
5. Serving Suggestions
The beauty of homemade cherry pie filling is in its versatility. While it’s most commonly used in a classic cherry pie, the possibilities are endless. Whether you’re crafting a stunning dessert or simply adding a touch of sweetness to your meal, here are some creative serving suggestions to make your cherry pie filling shine!
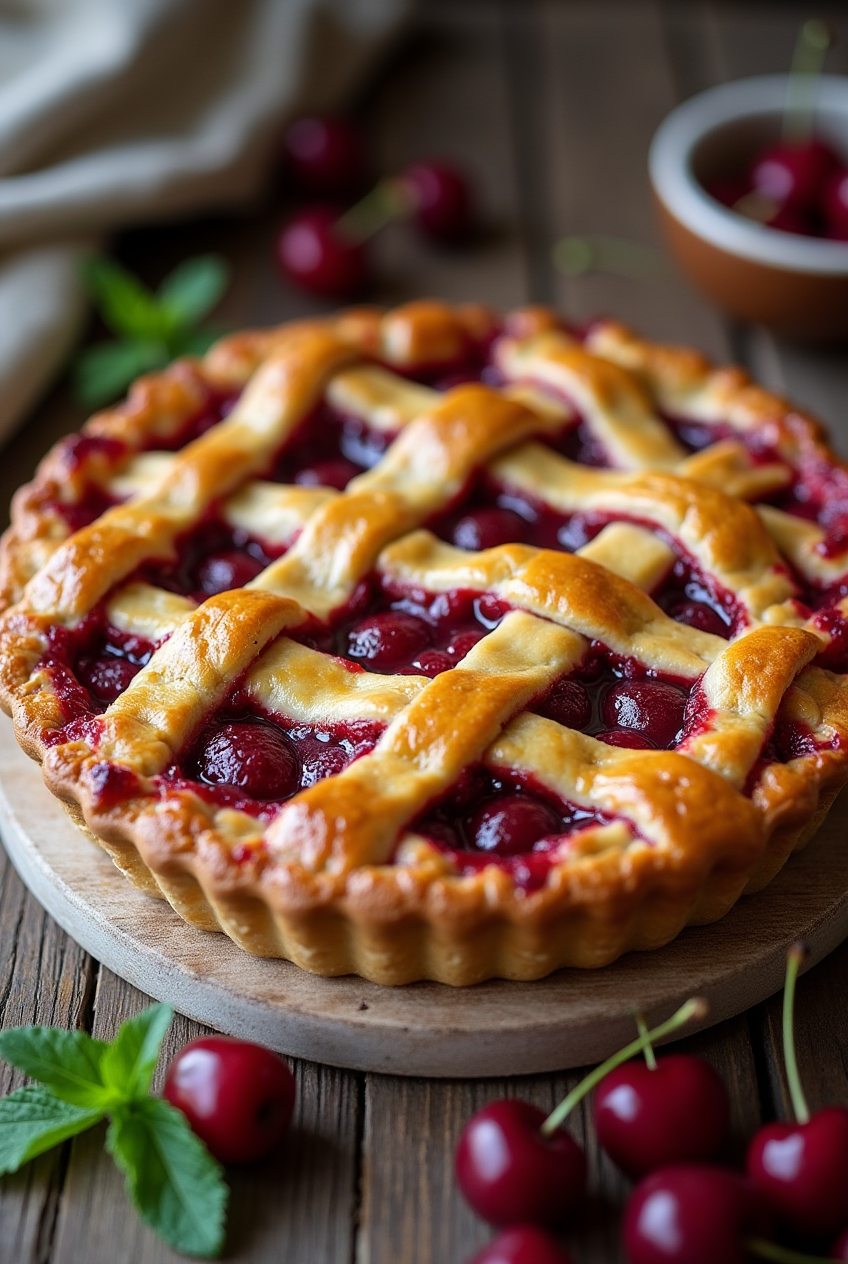
1. Classic Cherry Pie
Of course, the most traditional way to enjoy your cherry pie filling is in a freshly baked pie. Fill a buttery pie crust with your homemade cherry filling, top with a lattice crust or a full top crust, and bake until golden brown. Serve with a scoop of vanilla ice cream for the ultimate indulgence!
2. Cherry Topping for Ice Cream
Use your cherry pie filling as a topping for ice cream! Whether it’s vanilla, chocolate, or even a creamy cheesecake flavor, the sweet cherries and their thick syrup add the perfect balance of flavor and texture. Try it on top of a sundae with whipped cream and a cherry on top!
3. Cherry Parfaits
Layer your cherry pie filling with Greek yogurt or whipped cream and granola for a light and refreshing dessert parfait. You can even add some chopped nuts or a sprinkle of cinnamon for extra crunch and flavor.
4. Cherry-Filled Crepes
For a breakfast or brunch treat, spoon your cherry pie filling inside delicate crepes. Top with a dusting of powdered sugar and a drizzle of chocolate sauce for a decadent dish that’s sure to impress.
5. Cherry Tartlets
If you’re looking to make individual servings, try using your cherry pie filling in mini tartlet shells. You can even add a dollop of whipped cream or a sprinkle of toasted almonds for a touch of elegance.
6. Cherry-Filled Pancakes or Waffles
Why settle for plain pancakes or waffles when you can add a spoonful of cherry pie filling? This makes for a delightful breakfast or dessert. Serve with whipped cream, a dusting of powdered sugar, or a drizzle of maple syrup for an extra treat!
7. Cherry Scones or Biscuits
For an afternoon tea or snack, spread your cherry pie filling on freshly baked scones or flaky biscuits. It’s a simple way to elevate your baked goods and impress your guests.
8. Savory Twist
Looking for something unique? Use your cherry pie filling as a topping for grilled meats like pork or chicken. The sweet, tangy cherries pair wonderfully with savory dishes, adding an unexpected burst of flavor.
9. Cherry Jam or Spread
If you’ve made extra cherry pie filling and want to preserve it, consider turning it into a homemade jam or spread. Just cook it down further until it reaches a thicker, jam-like consistency, and store it in a jar for later use on toast, muffins, or in sandwiches.
10. Cherry Smoothies
For a refreshing treat, blend your cherry pie filling into a smoothie! Combine with yogurt, a splash of milk, and some ice for a delicious, fruity drink that’s perfect for any time of day.
Pro Tip:
Don’t forget, the cherry filling can also be used as a topping for cheesecakes, cakes, or even stirred into oatmeal for a sweet breakfast twist. The possibilities are truly endless!
Cherry pie filling isn’t just for pies—it’s an incredibly versatile ingredient that can be used in many creative ways. Whether you’re serving it as a topping or incorporating it into another dessert, it’s sure to bring a touch of sweetness to every dish. Get creative and make this cherry pie filling a star in your kitchen!
6. Conclusion
Making your own cherry pie filling is an incredibly rewarding experience, and with just a few simple ingredients, you can create a flavorful, versatile filling that elevates any dessert. Whether you’re baking a classic cherry pie, topping your favorite ice cream, or getting creative with other sweet treats, homemade cherry pie filling adds a touch of homemade goodness that’s hard to beat.
By following this easy recipe, you’ll have a delicious filling that’s not only bursting with sweet, tart cherry flavor but also perfectly thickened to give your pies and desserts that irresistible texture. Plus, with the pro tips and fun variations provided, you’ll be able to customize it to suit your taste and make it your own.
The best part? You can make this filling in advance, store it in the fridge for a few days, and always have a delicious addition ready for any dessert craving or special occasion.
So whether you’re a seasoned baker or just starting your cherry-filled journey, this recipe is perfect for making your day sweeter—and your desserts even more delightful!
Now, it’s time for you to grab those cherries, get cooking, and enjoy the sweet rewards of your homemade cherry pie filling. Happy baking!
Can Cherry Pie Filling Recipes Make Your Day Sweeter?
Ingredients
Ingredients
- Now that you’re excited to make your own cherry pie filling let’s take a look at the simple ingredients you’ll need. This recipe is all about making a delicious, fresh filling with minimal effort!
Ingredients:
4 cups fresh or frozen cherries – Sweet or tart, both work beautifully! Fresh cherries will give the filling a vibrant, natural flavor, while frozen cherries are perfect when fresh ones aren’t in season.
1 cup granulated sugar – You can adjust the amount to suit your sweetness preference. For a less sugary filling, feel free to reduce the sugar by a tablespoon or two.
2 tablespoons cornstarch – This is your thickening agent, giving the filling that perfect consistency. If you prefer a thicker filling, you can add a bit more cornstarch, but start small and adjust.
1 tablespoon lemon juice – Just a dash of lemon juice enhances the natural flavor of the cherries and balances the sweetness. If you don’t have fresh lemon, bottled juice will do the trick!
1 teaspoon vanilla extract – Adds a warm, aromatic depth to the filling. You could also experiment with almond extract for a slightly nutty twist.
1/4 cup water – This helps to bring everything together as the cherries cook down, creating that luscious pie filling texture.
Tips for Success:
Use fresh cherries when possible: The fresher the cherries, the more vibrant and natural the flavor will be. If you’re using frozen cherries, make sure to thaw and drain them to avoid excess moisture.
Adjust the sweetness: Everyone’s taste is different, so feel free to adjust the sugar level to your liking. For a lower-sugar option, you can substitute with stevia, honey, or maple syrup.
Thickening options: Cornstarch is the most common thickener, but if you prefer a different option, arrowroot powder or tapioca starch can also work well.
Instructions
How to Make Cherry Pie Filling
- Ready to turn those simple ingredients into a luscious, homemade cherry pie filling? It’s easier than you might think! Follow these steps, and you’ll have a rich, flavorful filling that’s perfect for pies, cakes, or whatever dessert you choose.
Step-by-Step Instructions:
Prepare the Cherries: If you’re using fresh cherries, start by pitting them and slicing them in half. This can be a little time-consuming, but it’s worth the effort for that fresh taste. For frozen cherries, just thaw them and drain any excess water.
Combine Sugar and Cornstarch: In a medium saucepan, whisk together the sugar and cornstarch. This creates a base for the filling and ensures that your mixture thickens evenly.
Add the Cherries: Stir the cherries into the sugar and cornstarch mixture. If you’re using frozen cherries, be sure to add them while they’re still thawed, so they release their juices into the mixture.
Simmer the Mixture: Add the water and lemon juice to the pan, then place it over medium heat. Stir frequently as the mixture begins to come to a gentle simmer. This is where the magic happens—watch as the filling begins to thicken and turn into a glossy, rich texture.
Cook Until Thickened: Continue cooking the filling for about 5-7 minutes, stirring occasionally. You’ll notice it getting thicker as the cornstarch does its job. Once it reaches a smooth, thick consistency, remove it from the heat.
Add Vanilla: Stir in the vanilla extract (or almond extract if you’re feeling adventurous!). This adds a wonderful aroma and a depth of flavor that makes the filling truly special.
Let It Cool: Allow the cherry pie filling to cool before using it in your pie or dessert. It will thicken a little more as it cools, creating the perfect consistency for filling your crust.
Pro Tips:
- Don’t Rush the Simmer: Be patient and let the mixture simmer until it thickens. If you rush it, you might end up with a runny filling.
- Test Consistency: To check if your filling is thick enough, dip a spoon into the mixture. If the filling coats the back of the spoon and holds its shape, it’s ready.
- Flavor Boost: For an extra layer of flavor, consider adding a pinch of cinnamon or almond extract along with the vanilla. It can take your cherry pie filling to the next level!
Notes
- Calories: 130
- Fat: 0g
- Carbohydrates: 35g
- Fiber: 2g
- Sugar: 28g
- Protein: 1g
- Sodium: 5mg
- Cholesterol: 0mg
7. FAQs
Let’s wrap up with some frequently asked questions about cherry pie filling. Whether you’re a first-time baker or a seasoned pro, it’s always helpful to get answers to any lingering questions. Here are some of the most common queries to help you make the perfect cherry pie filling every time.
1. Can I use frozen cherries instead of fresh?
Yes, you can absolutely use frozen cherries! Just make sure to thaw them first and drain any excess water before adding them to the filling. Frozen cherries work just as well as fresh and may even result in a slightly juicier filling, so you may want to cook the mixture a bit longer to achieve the desired thickness.
2. How long can I store homemade cherry pie filling?
You can store your cherry pie filling in an airtight container in the refrigerator for up to 4 days. If you’d like to keep it for longer, you can freeze it! Simply let the filling cool completely, then transfer it to a freezer-safe container. It will keep in the freezer for up to 3 months. Just thaw it in the fridge overnight before using.
3. How can I make cherry pie filling thicker?
If you prefer a thicker filling, you can add more cornstarch (or any other thickener like arrowroot or tapioca starch). Start by adding an extra teaspoon at a time while the filling is still simmering, stirring well to avoid clumps. Allow the filling to cook for a few more minutes to reach the perfect consistency.
4. Can I make this cherry pie filling without sugar?
Yes! You can substitute sugar with natural sweeteners like stevia, monk fruit, or erythritol for a lower-sugar version. Just be mindful that different sweeteners can vary in sweetness, so it’s important to adjust according to your taste preferences.
5. What if my filling is too runny?
If your cherry pie filling turns out too runny, simply return it to the stove and let it simmer on low heat for a few minutes. This will allow the excess liquid to evaporate, thickening the filling. You can also add a small amount of cornstarch mixed with water to help it thicken faster.
6. Can I use this filling for other desserts?
Absolutely! This cherry pie filling can be used in a variety of desserts, such as tarts, cobblers, cheesecakes, and even layered in cakes or parfaits. It’s also delicious when served over ice cream, yogurt, or pancakes for a quick and delightful treat.
7. Is this recipe suitable for making cherry jam?
While this cherry pie filling could be used to make a cherry jam, the consistency may need to be adjusted. To turn it into a jam, cook the filling longer to reduce the liquid, making it thicker and more spreadable. You can also add a bit of lemon juice and pectin to help with the gelling process.
8. Can I add spices to my cherry pie filling?
Yes! Adding spices like cinnamon, nutmeg, or even a pinch of clove can elevate your cherry pie filling. These spices pair beautifully with the sweet-tart cherries and add a comforting, warm flavor. Feel free to experiment to find your perfect combination.
9. Can I use this recipe for a cherry pie with a double crust?
Definitely! This cherry pie filling works perfectly in a double-crust pie. Simply roll out your bottom crust, add the cooled filling, and cover with a top crust. Make sure to vent the top crust with a few slits to allow steam to escape while baking.
With these FAQs in mind, you’ll be well-equipped to make the most of your homemade cherry pie filling. Whether you’re tweaking the recipe to suit your preferences or experimenting with new uses, this cherry filling will be a hit every time! Happy baking!