
There’s something truly special about the joy of homemade peach jam. The sweet, juicy peaches bring a burst of summer into every jar, and the canning process lets you preserve that delicious, natural flavor for months to come. If you’ve ever wondered how to can peach jam and enjoy its vibrant taste all year round, this simple and stunning recipe is for you. Whether you’re an experienced canner or a beginner, the step-by-step guide will make the process easy and rewarding. Imagine spreading a spoonful of this golden jam on your morning toast, stirring it into yogurt, or even gifting it to a friend—there’s no wrong way to enjoy it! Let’s dive in and discover how you can make this sweet treat right in your own kitchen.
Key Benefits of Canning Peach Jam
Making your own peach jam not only fills your kitchen with the delightful fragrance of ripe, fresh peaches, but it also offers a range of benefits that make the effort worthwhile. Let’s explore why this simple and stunning recipe should be your go-to for preserving the taste of summer.
Table of Contents
- Preserve Freshness: Canning allows you to preserve the natural flavor of peaches long after their season has passed. By making peach jam, you’re able to lock in that fresh, fruity taste, so you can enjoy it year-round.
- Long Shelf Life: One of the greatest perks of canning is the long shelf life. Properly sealed jars can last for up to a year, giving you a stash of homemade jam that’s perfect for spreading on toast, adding to desserts, or using in savory dishes.
- Control Over Ingredients: When you make peach jam at home, you have full control over what goes into it. You can opt for natural sweeteners, use less sugar, or even skip the pectin if you prefer a more rustic, chunky texture. The result is a healthier, customizable treat that suits your taste.
- A Perfect Homemade Gift: If you’re looking for a thoughtful gift, look no further. A jar of homemade peach jam is an excellent way to show you care. Its vibrant color and delicious flavor make it an attractive, personal gift for friends and family.
- Easy to Make: While canning may seem daunting at first, it’s actually quite simple. With just a few ingredients and the right tools, you can create a batch of jam that’s both stunning and delicious. Whether you’re new to canning or a seasoned pro, this recipe makes the process accessible and enjoyable.
Ready to enjoy the rewards of homemade peach jam? Keep reading, and I’ll guide you through each step of the process!
Ingredients for Peach Jam
Before you start, make sure you have everything you need to create your delicious homemade peach jam. The beauty of this recipe lies in its simplicity. You don’t need a lot of fancy ingredients—just fresh, high-quality peaches and a few pantry staples. Here’s what you’ll need:
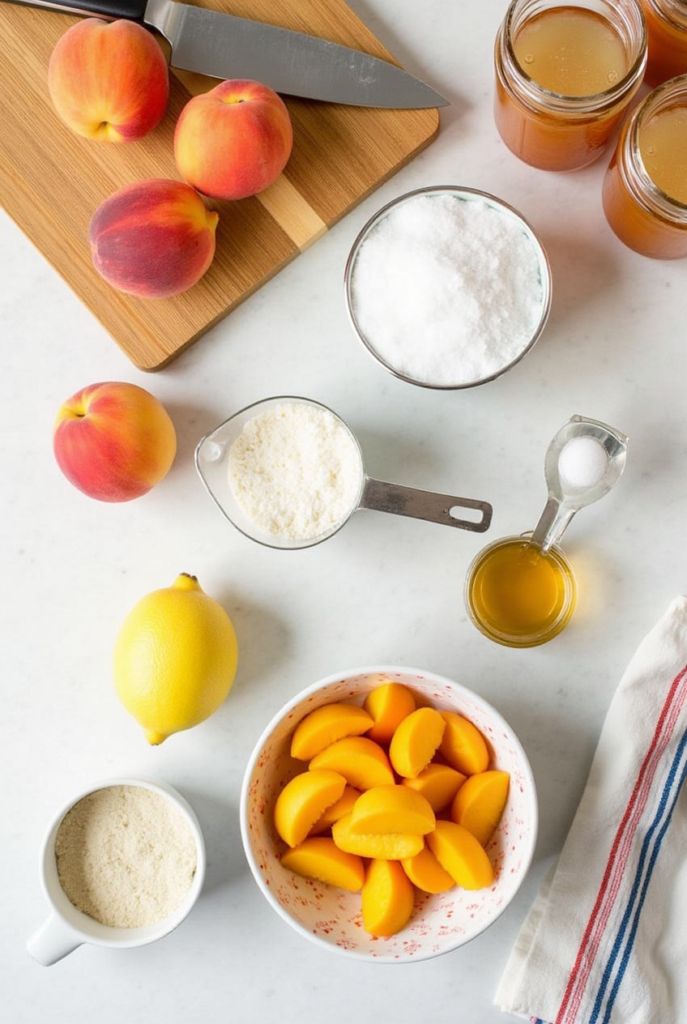
- Fresh Peaches: 4-5 medium-sized ripe peaches (about 4 cups when chopped). The key to the best peach jam is choosing peaches that are perfectly ripe—sweet, juicy, and fragrant.
- Sugar: 3 cups. Sugar not only sweetens the jam but also helps it set by drawing out the natural pectin in the fruit.
- Pectin: 1 box (about 1.75 oz). Pectin helps the jam achieve its signature thick and spreadable texture. You can opt for regular or low-sugar pectin, depending on your preference.
- Lemon Juice: 2 tablespoons. The acidity of lemon juice enhances the peach flavor and helps with the preservation process. Plus, it balances out the sweetness for a more complex taste.
- Water: 1/4 cup. A small amount of water is needed to dissolve the sugar and pectin before bringing it to a boil.
- Canning Jars: 4-5 pint-sized jars, sterilized. This is crucial for the canning process, ensuring the jam stays sealed and safe for long-term storage.
Pro Tip: If you want a smoother texture, feel free to use a potato masher or immersion blender to mash the peaches before cooking. If you like a chunkier jam, simply chop the peaches into small pieces and skip the mashing step!
Once you’ve gathered your ingredients, you’re ready to move on to the next steps. Remember, quality ingredients make all the difference, so take a moment to pick out the best peaches from your local market or grocery store!
How to Make Peach Jam: A Step-by-Step Guide
Making peach jam is a fun, rewarding process that transforms simple ingredients into a sweet, homemade treat. Here’s a step-by-step guide to help you through the canning process, from start to finish. Don’t worry, I’ll walk you through each step, so you can enjoy the process and end up with jars of delicious peach jam.
Step 1: Prepare the Peaches
Start by washing the peaches thoroughly. Then, peel the skins off using a simple blanching method:
- Bring a pot of water to a boil and prepare a bowl of ice water.
- Score an “X” at the bottom of each peach and drop them into the boiling water for about 30 seconds.
- Immediately transfer the peaches to the ice water to stop the cooking process. The skins will peel off easily.
Once peeled, pit and chop the peaches into small chunks. You’ll want about 4 cups of chopped peaches for the jam.
Step 2: Cook the Jam
In a large pot, combine the chopped peaches, sugar, lemon juice, and water. Stir the mixture over medium heat until the sugar dissolves. Once the sugar is dissolved, stir in the pectin and bring the mixture to a boil. Make sure to stir constantly to prevent it from sticking to the bottom of the pot.
- Tip: If you prefer a chunkier jam, you can leave the peaches as is, or use a potato masher to break them down to your preferred consistency.
Once the jam starts to boil, continue cooking for 10-15 minutes, until the jam thickens. You can check the consistency by spooning a small amount onto a cold plate—if it holds its shape and doesn’t run, it’s ready to be jarred!
Step 3: Sterilize the Jars
While your jam is cooking, it’s time to prepare your canning jars. Sterilizing the jars is essential for safety and proper preservation. Place the jars in a large pot of boiling water for about 10 minutes. Then, carefully remove them using tongs and let them dry upside down on a clean towel.
Step 4: Can the Peach Jam
Once your jam has reached the desired consistency, it’s time to can it:
- Ladle the hot jam into the sterilized jars, leaving about 1/4-inch of headspace at the top.
- Wipe the rims of the jars with a clean cloth to ensure there’s no jam residue, which can affect the seal.
- Place the lids on the jars and screw on the bands until they’re fingertip-tight.
Step 5: Process the Jars
To seal the jars, you’ll need to process them in a water bath:
- Place the filled jars into a large pot of boiling water, making sure the jars are completely submerged.
- Boil the jars for 10 minutes to ensure they’re sealed properly.
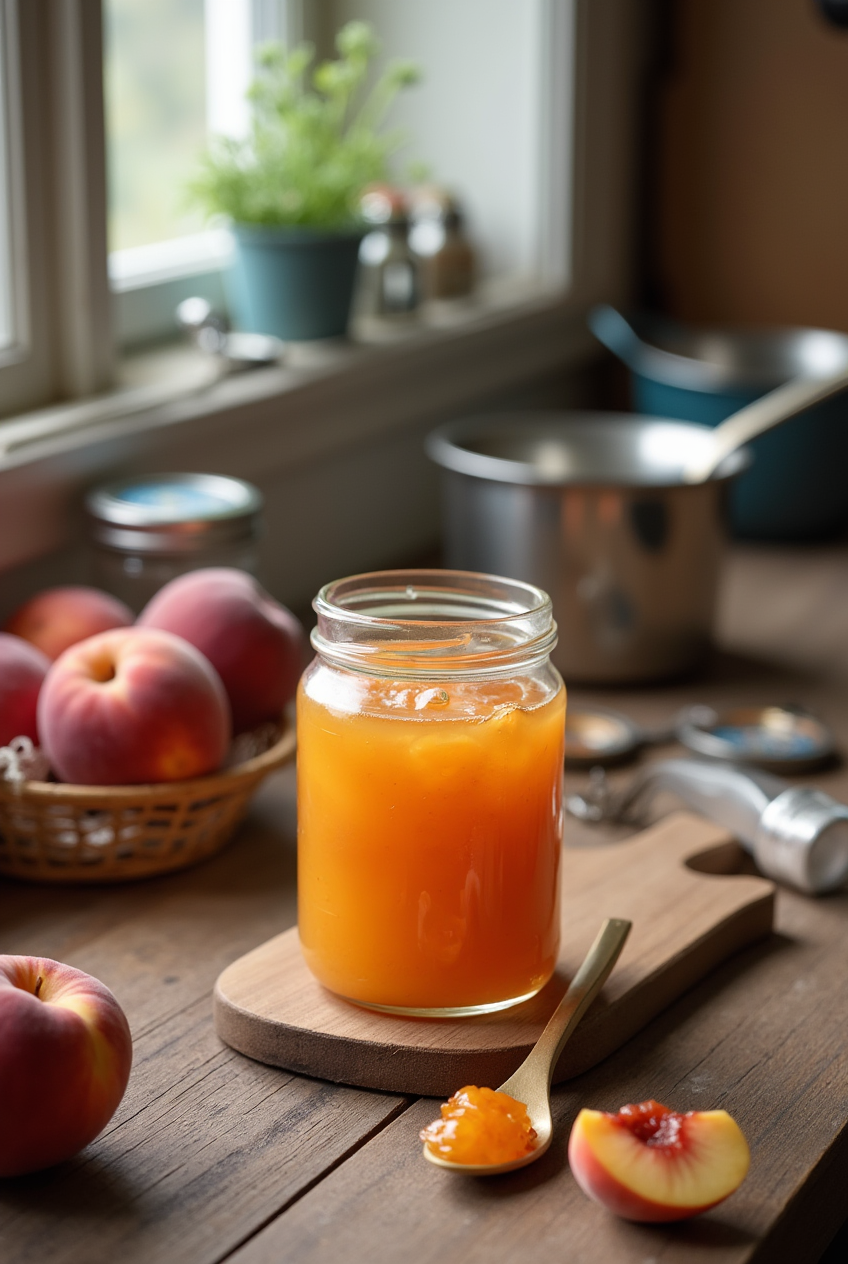
- Carefully remove the jars from the water and let them cool completely. You should hear a satisfying “pop” as the jars seal.
Once cooled, store your jam in a cool, dark place. Your homemade peach jam is now ready to be enjoyed!
Pro Tip: If you’re unsure whether the jars have sealed properly, gently press down on the center of each lid. If it doesn’t pop back, the jar has sealed correctly. If it does pop back, refrigerate that jar and use it within a few weeks.
Now that you’ve made your own peach jam, you can feel proud of the delicious, homemade treat you’ve preserved!
Pro Tips and Variations for Perfect Peach Jam
Making peach jam is an art, and with a few expert tips, you can elevate your jam-making game to the next level. Whether you’re looking for a little flavor boost or seeking ways to ensure your jam turns out perfect every time, these pro tips and variations will help you create a batch that’s uniquely yours.
1. Choosing the Best Peaches
- Freshness is Key: The better the peaches, the better the jam. Choose ripe, firm peaches that are fragrant and slightly soft to the touch. Overripe peaches may result in a runny jam, while underripe peaches can make it too stiff.
- Freeze for Later: If peaches are out of season, you can freeze ripe peaches to use later. Just peel, chop, and freeze them in a single layer before transferring to a bag or container for long-term storage.
2. Adjusting Sweetness
If you’re looking to cut back on sugar, there are several options:
- Less Sugar: You can reduce the sugar by up to 25% without affecting the texture too much. If you prefer a less sweet jam, feel free to experiment.
- Alternative Sweeteners: Try honey or maple syrup for a different twist. These alternatives may alter the flavor slightly but can add depth and richness to your jam.
3. Adding Flavor Variations
Peach jam is versatile, and a few added ingredients can make it uniquely yours:
- Cinnamon & Nutmeg: A pinch of ground cinnamon or nutmeg can warm up the flavor profile and add a cozy, spiced twist.
- Vanilla Extract: Add a teaspoon of vanilla extract for a subtle, sweet depth that complements the peaches beautifully.
- Ginger: Fresh ginger adds a zesty kick and pairs wonderfully with the sweetness of peaches.
- Herbs: For a more savory variation, consider adding a few sprigs of fresh rosemary or thyme while cooking the jam. Just be sure to remove the herbs before canning!
4. Fixing Common Issues
Even the best canners run into challenges, but don’t worry—there are simple fixes:
- Too Runny? If your jam doesn’t set properly, don’t panic. Add more pectin (or cook it a bit longer) and reprocess the jam in the jars.
- Too Thick? If your jam ends up too thick, just add a little water, lemon juice, or even fruit juice to loosen it up. Heat it again until you reach the desired consistency.
5. Canning Safety Tips
- Ensure Proper Sealing: Always check the seals on your jars. If you press the center of the lid and it doesn’t pop back, the jar has sealed correctly. If the lid pops back, refrigerate that jar and use it within a few weeks.
- Sterilization Is Crucial: Make sure your jars, lids, and tools are properly sterilized to prevent contamination. This is an essential step for long-lasting jam.
6. Experiment with Other Fruits
While this recipe focuses on peaches, you can easily swap them for other fruits. Try making:
- Peach-Mango Jam: Mix ripe mangoes with your peaches for a tropical twist.
- Peach-Strawberry Jam: Combine peaches and strawberries for a refreshing, fruity flavor.
- Peach Apricot Jam: Apricots add a bit of tartness that balances the sweet peaches perfectly.
With these pro tips and variations, you can make this peach jam your own, whether you’re adjusting the sweetness, adding spices, or trying out new fruit combinations. The possibilities are endless, so don’t hesitate to get creative!
Serving Suggestions for Peach Jam
Once your homemade peach jam is perfectly canned and ready to go, it’s time to enjoy it! This sweet, vibrant spread is not only perfect for toast but can be used in a variety of creative ways to elevate your meals and treats. Here are some delicious serving ideas to inspire you:
1. Classic Toast or Biscuit Spread
The simplest and most beloved way to enjoy peach jam is by spreading it on a warm slice of toast or a flaky biscuit. The sweet, juicy flavor pairs beautifully with the buttery richness of the bread. It’s the perfect way to start your day with a taste of summer!
2. Stir into Yogurt or Oatmeal
For a quick and healthy breakfast, swirl a spoonful of peach jam into your yogurt or oatmeal. The fruity sweetness adds a burst of flavor, and the natural sugars from the peaches make it a delightful addition to your morning routine. It’s like having your favorite jam in a more nutritious form!
3. Use in Baking
Peach jam makes a fantastic filling for pastries, tarts, and cookies. Try using it as a filling in thumbprint cookies, Danish pastries, or even between layers of a cake. The jam adds a fruity, vibrant color and delicious sweetness that can elevate any baked good.
4. Glaze for Meat or Vegetables
Surprising as it may seem, peach jam is excellent when used as a glaze for meats like chicken or pork. The sweetness from the jam pairs wonderfully with savory dishes, creating a perfect balance of flavors. You can also use it as a glaze for roasted vegetables, such as carrots or sweet potatoes, for an extra pop of flavor.
5. As a Topping for Cheese
Peach jam is a great accompaniment to a cheese board. The sweet, tangy jam pairs wonderfully with soft cheeses like brie, goat cheese, or cream cheese. Spread it on crackers or a slice of baguette with your favorite cheese for a sophisticated, flavorful snack.
6. Sweeten Beverages
Try adding a spoonful of peach jam to iced tea, lemonade, or even sparkling water for a fruity twist on your drinks. The natural sweetness and peachy flavor make it a perfect, refreshing addition to your beverages, especially during warm months.
7. Gift It to Friends and Family
If you’ve made extra batches of peach jam, consider gifting jars to your loved ones. It’s a thoughtful, homemade gift that’s sure to brighten anyone’s day. Package it with a nice ribbon or a hand-written label to make it extra special.
These are just a few ideas for serving your peach jam, but the possibilities are endless! Whether you’re enjoying it on a classic breakfast dish or adding it to a savory meal, this homemade peach jam is sure to become a staple in your kitchen. Don’t forget to get creative and experiment with new ways to incorporate it into your meals!
Conclusion: Enjoy Your Homemade Peach Jam
Congratulations! You’ve now made your very own peach jam, and the sweet rewards are waiting for you. Whether it’s spreading it on toast, pairing it with cheese, or gifting it to friends and family, this jam will quickly become a favorite in your kitchen. The process of canning peach jam is not only easy and fun but also incredibly satisfying. By using fresh, ripe peaches and following these steps, you’ve created a delicious treat that captures the essence of summer in every jar.
Remember, making peach jam is all about experimenting and finding what works best for you. Don’t hesitate to adjust the sweetness, add spices, or try different fruit combinations to suit your personal taste. The possibilities are endless!
Pro Tip: Always store your homemade peach jam in a cool, dark place to maintain its flavor and freshness. Once opened, keep it in the refrigerator, where it should last for up to a month.
Your homemade peach jam is not just a recipe—it’s an experience. The joy of preserving fresh fruit and the comfort of spreading it on your favorite foods makes this jam an essential in any home. Enjoy your creation, and feel proud knowing that you’ve made something truly special.
How to Can Peach Jam Recipe That’s Simple and Stunning
Ingredients
Ingredients for Peach Jam
- Before you start make sure you have everything you need to create your delicious homemade peach jam. The beauty of this recipe lies in its simplicity. You don’t need a lot of fancy ingredients—just fresh, high-quality peaches and a few pantry staples. Here’s what you’ll need:
- Fresh Peaches: 4-5 medium-sized ripe peaches about 4 cups when chopped. The key to the best peach jam is choosing peaches that are perfectly ripe—sweet, juicy, and fragrant.
- Sugar: 3 cups. Sugar not only sweetens the jam but also helps it set by drawing out the natural pectin in the fruit.
- Pectin: 1 box about 1.75 oz. Pectin helps the jam achieve its signature thick and spreadable texture. You can opt for regular or low-sugar pectin, depending on your preference.
- Lemon Juice: 2 tablespoons. The acidity of lemon juice enhances the peach flavor and helps with the preservation process. Plus it balances out the sweetness for a more complex taste.
- Water: 1/4 cup. A small amount of water is needed to dissolve the sugar and pectin before bringing it to a boil.
- Canning Jars: 4-5 pint-sized jars sterilized. This is crucial for the canning process, ensuring the jam stays sealed and safe for long-term storage.
Pro Tip: If you want a smoother texture, feel free to use a potato masher or immersion blender to mash the peaches before cooking. If you like a chunkier jam, simply chop the peaches into small pieces and skip the mashing step!
Instructions
- How to Make Peach Jam: A Step-by-Step Guide
- Making peach jam is a fun, rewarding process that transforms simple ingredients into a sweet, homemade treat. Here’s a step-by-step guide to help you through the canning process, from start to finish. Don’t worry, I’ll walk you through each step, so you can enjoy the process and end up with jars of delicious peach jam.
Step 1: Prepare the Peaches
- Start by washing the peaches thoroughly. Then, peel the skins off using a simple blanching method:
- Bring a pot of water to a boil and prepare a bowl of ice water.
- Score an “X” at the bottom of each peach and drop them into the boiling water for about 30 seconds.
- Immediately transfer the peaches to the ice water to stop the cooking process. The skins will peel off easily.
- Once peeled, pit and chop the peaches into small chunks. You’ll want about 4 cups of chopped peaches for the jam.
Step 2: Cook the Jam
- In a large pot, combine the chopped peaches, sugar, lemon juice, and water. Stir the mixture over medium heat until the sugar dissolves. Once the sugar is dissolved, stir in the pectin and bring the mixture to a boil. Make sure to stir constantly to prevent it from sticking to the bottom of the pot.
- Tip: If you prefer a chunkier jam, you can leave the peaches as is, or use a potato masher to break them down to your preferred consistency.
- Once the jam starts to boil, continue cooking for 10-15 minutes, until the jam thickens. You can check the consistency by spooning a small amount onto a cold plate—if it holds its shape and doesn’t run, it’s ready to be jarred!
Step 3: Sterilize the Jars
- While your jam is cooking, it’s time to prepare your canning jars. Sterilizing the jars is essential for safety and proper preservation. Place the jars in a large pot of boiling water for about 10 minutes. Then, carefully remove them using tongs and let them dry upside down on a clean towel.
Step 4: Can the Peach Jam
- Once your jam has reached the desired consistency, it’s time to can it:
- Ladle the hot jam into the sterilized jars, leaving about 1/4-inch of headspace at the top.
- Wipe the rims of the jars with a clean cloth to ensure there’s no jam residue, which can affect the seal.
- Place the lids on the jars and screw on the bands until they’re fingertip-tight.
Step 5: Process the Jars
- To seal the jars, you’ll need to process them in a water bath:
- Place the filled jars into a large pot of boiling water, making sure the jars are completely submerged.
- Boil the jars for 10 minutes to ensure they’re sealed properly.
- Carefully remove the jars from the water and let them cool completely. You should hear a satisfying “pop” as the jars seal.
Notes
- Calories: 50
- Total Fat: 0g
- Saturated Fat: 0g
- Cholesterol: 0mg
- Sodium: 0mg
- Total Carbohydrates: 13g
- Sugars: 12g
- Dietary Fiber: 0.5g
- Protein: 0g
FAQs About Making Peach Jam
If you’re new to canning or peach jam, you may have a few questions. Don’t worry—you’re not alone! Here are some of the most frequently asked questions to help guide you through the process and ensure your homemade peach jam turns out perfect every time.
1. How long will homemade peach jam last?
Properly canned peach jam can last up to one year when stored in a cool, dark place. Once opened, keep the jar in the refrigerator and enjoy it within 3-4 weeks. Always check the jar for any signs of spoilage, like mold or an off smell, before using.
2. Can I make peach jam without pectin?
Yes, you can! If you prefer to avoid using pectin, you can make a natural peach jam by cooking the peaches longer to reduce the liquid. The natural pectin in the fruit will help the jam set. Keep in mind that this method may take longer, and the consistency might vary slightly.
3. How do I know when my jam is ready?
To check if your peach jam is ready, do the “plate test.” Place a small spoonful of jam on a cold plate, then place it in the freezer for a minute. Run your finger through it—if it wrinkles and doesn’t run, it’s done! If it’s still runny, continue cooking for a few more minutes and test again.
4. Can I use frozen peaches to make jam?
Absolutely! If fresh peaches aren’t in season or you want to make jam later in the year, frozen peaches work just as well. Just make sure to thaw them completely before using and drain off any excess liquid to prevent your jam from being too watery.
5. What can I do if my peach jam is too runny?
If your jam doesn’t thicken as expected, it’s likely because it didn’t cook long enough or didn’t have enough pectin. Don’t worry—you can fix it! Just return the jam to the pot, add more pectin, and cook it for an additional 10-15 minutes, then test again for the desired consistency.
6. How can I reduce the sugar in my peach jam?
If you want a lower-sugar version, you can reduce the sugar amount by up to 25%. You can also experiment with alternative sweeteners like honey, maple syrup, or agave. Keep in mind that reducing sugar may affect the jam’s shelf life, so you might want to consume it sooner.
7. Can I add other fruits to my peach jam?
Definitely! Peach jam pairs wonderfully with other fruits. Try adding strawberries, raspberries, or even mango for a fun twist. When mixing fruits, ensure the proportions stay balanced to maintain the proper texture and flavor.
8. Can I double the recipe?
You can absolutely double the recipe, but it’s important to make sure your jam boils consistently. If you increase the batch size too much, it may take longer to reach the desired consistency, so be patient and keep stirring to avoid burning.
Making peach jam can be a truly enjoyable experience, and with these answers, you should feel more confident in your canning adventure. Don’t hesitate to get creative and make this recipe your own. Happy jamming!